Christmas is my absolute favorite time of year for baking. The kitchen fills with such a cozy warmth, and the smells alone just make you smile. Every holiday season, my family gathers, and we always have our beloved classics, but last year, my youngest, Lily, had a brilliant idea. She looked at our usual cookie spread and, with a mischievous grin, said, “Mom, what if we made Twisted Christmas Cookies?”
I paused, spatula in hand, and imagined the possibilities. She pictured cookies swirled with different colors and flavors, something truly eye-catching. It wasn’t about making them complicated, but about giving our traditional cookie plate a fun, unexpected spin. That little request sparked a whole new tradition for us, and these Twisted Christmas Cookies quickly became the star of our dessert table.
The kids loved helping with the twisting part. Their laughter filled the kitchen as they experimented with different patterns. Seeing their joy and the beautiful, unique results made my heart happy. It truly brought everyone together, fostering those precious moments we cherish during the holidays.
When we finally put the platter of Twisted Christmas Cookies on the table, the reactions were priceless. Everyone immediately commented on how pretty and festive they looked. My husband, Mark, who usually goes straight for the gingerbread, was captivated by the colorful swirls. “What a fun idea, Lyra!” he said, reaching for one of the red and white spirals.
He took a bite, and his eyes lit up. “These are amazing! So much flavor, and the texture is perfect.” The conversations around the table quickly turned to how unique these cookies were. My sister-in-law asked for the recipe on the spot, marveling at how something so beautiful could also be so easy to make. These Twisted Christmas Cookies weren’t just a dessert; they were a conversation starter, a creative outlet, and a delicious new family memory all rolled into one. They made our holiday gathering feel extra special and definitely stuck around in our meal rotation.
This simple request from Lily transformed our holiday baking. These Twisted Christmas Cookies prove that sometimes the best traditions start with a little twist on the familiar. I learned that adding a touch of playful creativity can really make a dish sing and bring even more joy to the table. I can’t wait for you to try this recipe for your own family and watch their faces light up. It’s a wonderful way to create your own Unique Holiday Treats and special memories.
What You’ll Need for These Twisted Christmas Cookies
Making these Twisted Christmas Cookies is all about using simple, wholesome ingredients to create something truly special. Trust me, this ingredient list keeps things straightforward without sacrificing any of that festive flavor or fun visual appeal. You’ll find everything you need for these beautiful Twisted Christmas Cookies at your regular grocery store, which is always a win in my book. We’re aiming for delicious and doable, not a scavenger hunt!
For the best Twisted Christmas Cookies, I recommend using good quality butter and pure vanilla extract. These two ingredients are the backbone of our cookie dough, so their flavor really shines through. Don’t skimp on them if you can help it! My family always prefers when I use unsalted butter in our Twisted Christmas Cookies because it gives me control over the saltiness, allowing the other flavors to pop.
Here’s a Twisted Christmas Cookies secret that makes all the difference: make sure your butter is truly at room temperature. It creams so much better with the sugar, creating a light, airy base for our dough. This helps your cookies have that perfect melt-in-your-mouth texture. If your butter is too cold, your dough won’t be as smooth, and if it’s too warm, it can make the cookies spread too much in the oven.
This Twisted Christmas Cookies recipe is also quite forgiving if you need to swap a few things. If you don’t have all-purpose flour, a good quality cake flour can make them even more tender, though it might require a slight adjustment to the liquid, so stick to all-purpose if you’re new to baking these. For the festive colors, I prefer gel food coloring because it gives a vibrant hue without adding too much liquid to the dough, which can affect the texture of your Twisted Christmas Cookies. You can find these gel colors in the baking aisle.
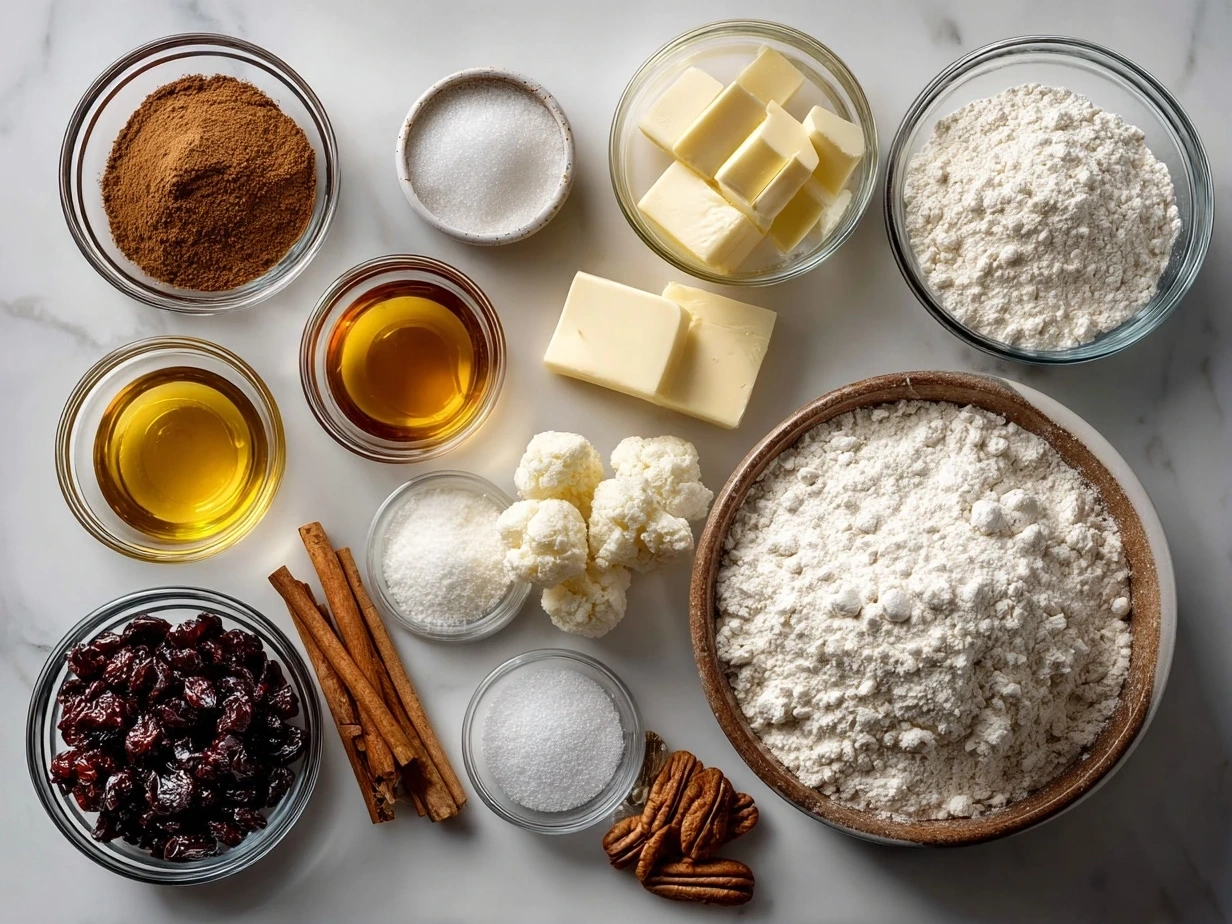
Ingredients:
- 1 cup (2 sticks) unsalted butter, softened to room temperature
- 1 ½ cups granulated sugar
- 2 large eggs
- 2 teaspoons pure vanilla extract
- 3 ½ cups all-purpose flour, plus more for dusting
- 1 teaspoon baking powder
- ½ teaspoon salt
- Red gel food coloring
- Green gel food coloring
When you’re gathering your ingredients, remember that a little prep wisdom goes a long way for easier cooking. Measuring out your flour, baking powder, and salt ahead of time and whisking them together ensures they’re evenly distributed when you add them to the wet ingredients. This step seems small, but it really helps create a consistent dough for your Twisted Christmas Cookies. It also streamlines the process so you can enjoy the Creative Festive Baking part even more.
How to Make Your Twisted Christmas Cookies
Now for the fun part: bringing these beautiful Twisted Christmas Cookies to life! Don’t worry, I’m here to walk you through each step. I remember when I first tried making Unconventional Christmas Recipes like these, I thought the twisting would be complicated. But it’s actually quite simple and incredibly satisfying. Your kitchen will smell amazing while these Twisted Christmas Cookies bake, filling your home with holiday cheer!
- Cream the Butter and Sugar: In a large mixing bowl, using an electric mixer, beat the softened butter and granulated sugar together until the mixture is light and fluffy. This typically takes me about 3-5 minutes. You’ll notice it changing from dense to a pale, airy texture. This step is crucial for the tender crumb of your Twisted Christmas Cookies.
- Add Eggs and Vanilla: Beat in the eggs one at a time, making sure each is fully incorporated before adding the next. Then, stir in the pure vanilla extract. Scrape down the sides of the bowl to ensure everything is well combined. This is where I used to mess up my Twisted Christmas Cookies – now I always remember to scrape the bowl to avoid unmixed pockets.
- Combine Dry Ingredients: In a separate medium bowl, whisk together the flour, baking powder, and salt. This ensures all the leavening and seasoning are evenly distributed throughout the dry mixture.
- Gradually Add Dry to Wet: With the mixer on low speed, gradually add the dry ingredient mixture to the wet ingredients, mixing until just combined. Be careful not to overmix the dough. Overmixing can develop the gluten too much, resulting in tough cookies instead of the tender Twisted Christmas Cookies we’re aiming for.
- Divide and Color the Dough: Divide the cookie dough evenly into three separate bowls. Leave one bowl plain. In the second bowl, add a few drops of red gel food coloring and mix until the color is vibrant and uniform. Repeat this process with the green gel food coloring in the third bowl. You want bright, distinct colors for these Modern Cookie Ideas. For a rich red or green, you might need a bit more gel color than you think.
- Chill the Dough (Crucial Step!): Flatten each colored dough portion into a disc, wrap them tightly in plastic wrap, and refrigerate for at least 1 hour. This chilling step is incredibly important! It helps the dough firm up, making it much easier to handle and twist without becoming sticky. It also prevents the cookies from spreading too much in the oven, keeping those beautiful twisted patterns intact for your Twisted Christmas Cookies.
- Preheat Oven and Prepare Baking Sheets: While the dough chills, preheat your oven to 375°F (190°C). Line several baking sheets with parchment paper or silicone baking mats. This makes cleanup a breeze and helps prevent sticking.
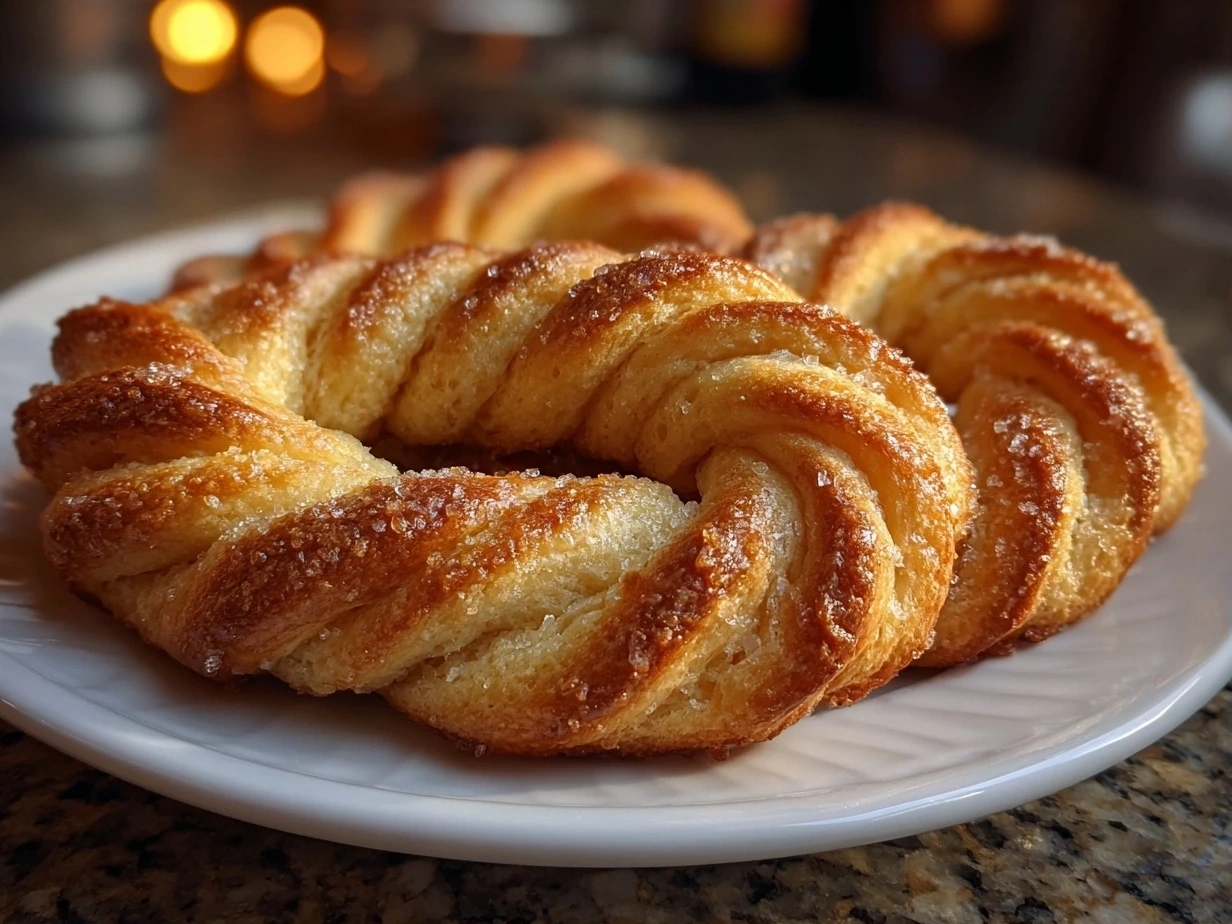
- Roll and Twist: On a lightly floured surface, take a small piece of red dough (about 1 tablespoon) and roll it into a 4-inch rope. Do the same with a piece of green dough and a piece of plain dough. Gently press the ends of the three ropes together, then carefully twist them together like a braid. Form the twisted rope into a circle or an S-shape, or any fun festive shape you like! Don’t worry if your Twisted Christmas Cookies look a little rustic at first; that’s part of their charm. You’ll know your Twisted Christmas Cookies dough is ready for twisting when it’s pliable but not sticky.
- Bake the Cookies: Place the shaped Twisted Christmas Cookies on the prepared baking sheets, leaving about 1-2 inches between them. Bake for 8-10 minutes, or until the edges are lightly golden and the cookies are set. These cookies don’t brown much on top because of the food coloring, so watch the edges carefully.
- Cool: Let the Twisted Christmas Cookies cool on the baking sheets for a few minutes before transferring them to a wire rack to cool completely. This prevents them from breaking and helps them firm up perfectly. While your Twisted Christmas Cookies are cooling, you’ll have time to start another batch or perhaps enjoy a cup of coffee. For more Festive Dessert Twists, you could even try dipping half of them in melted white chocolate once cooled!
Serving Your Delicious Twisted Christmas Cookies
Once these beautiful Twisted Christmas Cookies emerge from the oven, cooling on the rack, your kitchen will be filled with the sweet aroma of vanilla and holiday cheer. My family absolutely loves these Twisted Christmas Cookies when they’re still slightly warm, with a glass of cold milk or a steaming mug of hot cocoa. It’s such a comforting combination, especially after a chilly day. Everyone reaches for seconds when this Twisted Christmas Cookies platter comes out during our holiday movie nights!
These Twisted Christmas Cookies are perfect for so many occasions. They’re a fantastic addition to any holiday cookie exchange, where their unique look will definitely stand out among the usual suspects. They also make wonderful homemade gifts. Just package them in a pretty tin with a ribbon, and you’ve got a heartfelt present that shows you put in extra thought. For a touch more elegance, you can drizzle melted white chocolate over some of your Twisted Christmas Cookies once they’re completely cool. This adds another layer of flavor and makes them look even more professional.
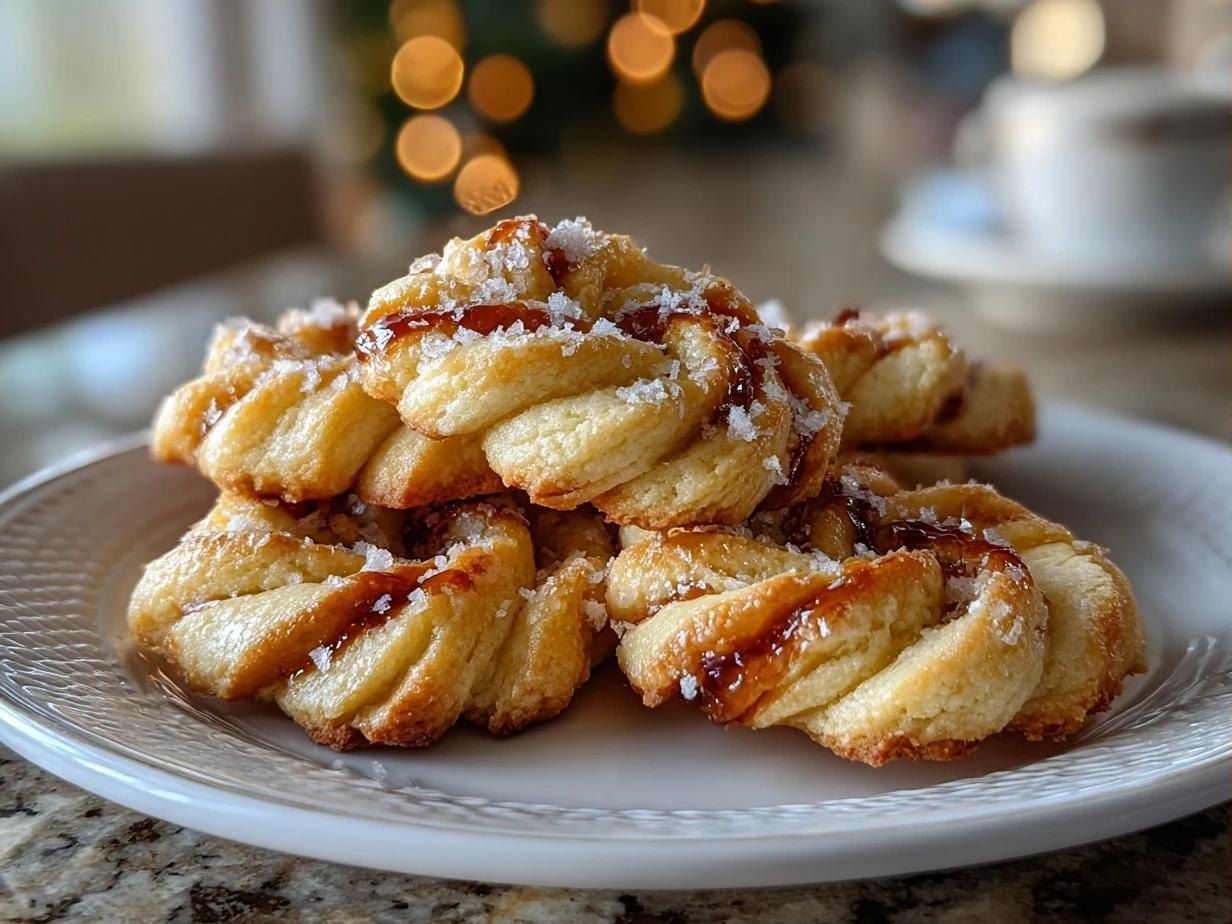
When it comes to presentation, arranging these Twisted Christmas Cookies on a simple white platter really makes their vibrant colors pop. You could even sprinkle a little edible glitter or some festive sprinkles on them before baking for an extra sparkly touch. I’ve found that even a simple sprig of fresh rosemary or a few cranberries placed around the edge of the platter can make the whole display look special. It’s all about creating that inviting holiday feeling!
If, by some miracle, you have any leftovers (which rarely happens in my house!), these Twisted Christmas Cookies store beautifully. Just place them in an airtight container at room temperature for up to a week. They stay fresh and delicious, ready for a quick snack or a last-minute visitor. I’ve also tried freezing them, and they thaw wonderfully, making them a great make-ahead option for busy holiday bakers. This makes them truly a hassle-free addition to your Unconventional Christmas Recipes collection.
We’ve tried a few variations with these Twisted Christmas Cookies that have been big hits. Sometimes, instead of vanilla and plain dough, I’ll make one batch peppermint-flavored and another with a hint of almond extract. The red and white peppermint swirl is particularly festive and pairs well with our gingerbread crinkle cookies, for another Creative Festive Baking idea. The feedback I’ve gotten is always about how much people appreciate the effort and thought put into making such visually appealing and tasty treats.
Your Questions Answered about Twisted Christmas Cookies
I know when you’re trying a new recipe, especially Modern Cookie Ideas like these Twisted Christmas Cookies, you probably have a few questions. I’ve been there, staring at a recipe, wondering about all the little details. So, let’s chat about some common questions I get from friends and family about making these fun holiday treats.
Can I make this Twisted Christmas Cookies dough ahead of time?
Absolutely! This is one of my favorite things about these Twisted Christmas Cookies. You can prepare the dough, color it, wrap the discs tightly, and refrigerate them for up to 2-3 days. When you’re ready to bake, just let the dough sit out for about 15-20 minutes to soften slightly, making it easier to roll and twist. This makes holiday baking so much less stressful!
What if I don’t have gel food coloring for my Twisted Christmas Cookies?
Liquid food coloring works, but you might need to use more of it to get vibrant colors. Be careful not to add too much liquid, as it can change the dough consistency. If the dough gets too sticky, you can add a tiny bit more flour, a teaspoon at a time, until it’s workable. Gel coloring really is best for these Twisted Christmas Cookies for vibrant, non-diluted colors.
How do I store leftover Twisted Christmas Cookies?
Once completely cooled, store your Twisted Christmas Cookies in an airtight container at room temperature for up to a week. They stay wonderfully fresh and retain their soft chew. If you want them to last longer, you can freeze them in a single layer, then transfer them to a freezer-safe bag for up to 2-3 months. Just thaw at room temperature before serving.
My Twisted Christmas Cookies spread too much. What went wrong?
This is a common issue! It’s usually due to butter being too warm or the dough not being chilled enough. Make sure your butter is softened, not melted. And please don’t skip the chilling step for the dough. A minimum of 1 hour in the fridge is key for holding those beautiful twists. Also, ensure your oven temperature is accurate; an oven that runs too cool can cause spreading. If you’re looking for more tips on baking without spreading, check out this great resource for Unique Holiday Treats from professional bakers: 56 Christmas Cookie Recipes from Pro Bakers & Writers.
Can I use different flavors for my Twisted Christmas Cookies?
Oh, yes! This recipe is fantastic for customization. Instead of just plain vanilla dough, you could add a teaspoon of peppermint extract to the red dough for a candy cane effect. Or try almond extract in the green dough. Even a touch of orange zest in the plain dough adds a lovely brightness. My daughter, Sarah, loves when I make a chocolate version by adding cocoa powder to one of the dough portions. It’s all about experimenting with Creative Festive Baking!
Are these Twisted Christmas Cookies suitable for gifting?
Absolutely! Their vibrant colors and unique twisted shape make them perfect for gifting. They pack well and look incredibly festive. Just make sure they are completely cool before packaging to prevent them from sticking together. They truly make a thoughtful, homemade present.
My kids want to help. What parts of making these Twisted Christmas Cookies are kid-friendly?
This recipe is very kid-friendly! My kids love dividing the dough, adding the food coloring, and especially the twisting part. Rolling the ropes and then twisting them together is a fantastic activity for little hands. It’s a great way to get them involved in making these Unconventional Christmas Recipes and create some wonderful family memories in the kitchen.
The Final Word
These Twisted Christmas Cookies have truly earned their place in our family’s holiday recipe collection. They’re not just incredibly delicious with their tender texture and sweet vanilla flavor, but they also bring so much joy and color to our festive table. It’s that perfect blend of classic comfort and whimsical charm that makes them so special. Every year, when the cookie cutters come out, Lily reminds me, “Don’t forget the Twisted Christmas Cookies, Mom!” And honestly, I wouldn’t dream of it.
My Twisted Christmas Cookies Tips:
- Don’t Rush the Chill: Seriously, that hour in the fridge makes all the difference for easy handling and beautiful shapes. It’s the secret to crisp, well-defined Twisted Christmas Cookies.
- Vibrant Colors are Key: Use gel food coloring! It gives those rich, deep reds and greens without thinning out your dough, ensuring your Twisted Christmas Cookies truly pop.
- Embrace the Imperfections: Each twisted cookie will be a little unique, and that’s perfectly okay! It adds to the homemade charm and shows the love that went into making them. No need for perfection, just deliciousness and fun.
We’ve had so much fun with variations on these Twisted Christmas Cookies. Beyond the red and green, a simple swirl of plain and chocolate dough is always a hit, especially with my son, Ben. He calls them “zebra cookies.” For a truly special touch, I’ve even made a version with a hint of gingerbread spice in one of the doughs, which reminds me of the delicious Smoky Gingerbread Men: A Fun Holiday Appetizer. Mark loves the classic red and green, while Lily always asks for extra sprinkles. This recipe is an amazing canvas for your own Creative Festive Baking ideas.
I encourage you to make these Twisted Christmas Cookies your own this holiday season. Let your family’s tastes and creativity guide you. Whether you stick to the classic colors or experiment with new flavors, I hope they bring as much laughter, warmth, and deliciousness to your home as they do to mine. May your kitchen be filled with happy bakers and your table with cherished memories. If you’re looking for even more inspiration, you might enjoy our Strawberry Crunch Cookies. For those exploring more dietary options, check out these 40 Fantastic Vegan Christmas Recipes – Rainbow Plant Life. Happy baking, friends!
\n \n Print
Twisted Christmas Cookies

These delightful Twisted Christmas Cookies feature a beautiful two-tone swirl and a tender, buttery crumb, making them a festive and delicious addition to your holiday cookie platter. Perfect for sharing, they bring a touch of whimsy and homemade charm to any Christmas celebration.
- Prep Time: 25 minutes
- Cook Time: 10 minutes
- Total Time: 35 minutes
- Yield: 36 cookies
- Category: Dessert
- Method: Baked
- Cuisine: American
Ingredients
- 2 ½ cups all-purpose flour
- 1 teaspoon baking powder
- ½ teaspoon salt
- 1 cup (2 sticks) unsalted butter, softened
- 1 cup granulated sugar
- 1 large egg
- 1 teaspoon vanilla extract
- Red or green gel food coloring (optional)
- 2 tablespoons unsweetened cocoa powder (for chocolate variation, optional)
- Sanding sugar or sprinkles, for decorating (optional)
Instructions
- In a medium bowl, whisk together flour, baking powder, and salt. Set aside.
- In a large bowl, cream together softened butter and granulated sugar until light and fluffy. Beat in the egg and vanilla extract until well combined.
- Gradually add the dry ingredients to the wet ingredients, mixing on low speed until just combined and a soft dough forms.
- Divide the dough in half. Leave one half plain, or color it with a few drops of gel food coloring (e.g., green). For the second half, you can leave it plain, or mix in the cocoa powder until evenly distributed (for chocolate twist), or color it a contrasting color (e.g., red).
- Form each half of the dough into a disc, wrap tightly in plastic wrap, and refrigerate for at least 30 minutes, or up to 2 hours.
- Preheat oven to 375°F (190°C). Line baking sheets with parchment paper.
- On a lightly floured surface, roll out one disc of dough into a rectangle about 1/8 to 1/4 inch thick. Repeat with the second disc.
- Carefully place one rolled-out rectangle directly on top of the other. Gently press them together.
- Using a sharp knife or pizza cutter, cut the stacked dough into strips about 1/2 inch wide and 4-5 inches long.
- Take one strip, gently twist it several times to create a spiral, and place on the prepared baking sheet. Repeat with remaining strips, leaving about 1 inch between cookies.
- If desired, sprinkle with sanding sugar or sprinkles before baking.
- Bake for 8-10 minutes, or until the edges are lightly golden.
- Let cookies cool on the baking sheet for a few minutes before transferring them to a wire rack to cool completely.
Notes
For an extra festive touch, drizzle cooled cookies with melted white chocolate and sprinkle with crushed candy canes, or dip one end in melted chocolate and nuts. Store in an airtight container at room temperature for up to a week.